General
From 14 December 2019 onward, the new European Plant Health Regulation will be in effect. This regulation applies to all European companies that work with phytosanitary regulated plant material. This regulation dictates that all plants meant for planting should have a passport. Every company trading in, importing or exporting these plants must be registered with a unique phytosanitary company registration number. This number must be present on all plant passports from 14 December 2019 onward. The lay-out of the plant passport has been set by the regulation, and strict rules apply to it. The passport must be added to the smallest trading unit.
The plant passport consists of the following mandatory elements:
- Upper-left corner: EU-flag
- Upper-right corner: the word ‘Plant Passport’
- ‘A’ + Botanical name
- ‘B’ + ISO-code member state, hyphen (‘-’), phytosanitary company registration number
- ‘C’ + Identification number
- ‘D’ + ISO-code country of origin/production
The identification number, element C, is the code that enables tracking within your own nursery manager. For WinTree® this is the batch number.
Element D on the plant passport contains the country of origin of the plant. If a foreign plant is present in your country for a set amount of time, it will Phyto sanitarily be your country’s. The set amounts of time are currently set as follows:
- Cuttings, perennial herbs, potted plants: after 4 weeks
- Woody plants, bulbs: after 1 full vegetation cycle (growth season)
- Bonsai-plants, Citrus plants: after 2 months
In WinTree®, these periods are set in ‘genus groups’. Each genus group can have a period set for them, and if necessary, an article can have a deviating period set. Check with your country’s inspecting authority if these periods are correct.
For trading with a Protected Zone (PZ, formerly ZP), some products require a PZ passport. The PZ passport lay-out is the same as the normal plant passport, with the addition of PZ coding and the organism’s EPPO code. These details are register in WinTree®’s PZ register. WinTree® CONNECT has a built-in PZ register containing the codes as they are known to TSD. TSD is not responsible for the data’s accuracy and correctness. This responsibility always lies with the customer.
The old plant passports used before 14 December 2019 will remain valid until 14 December 2023. from 14 December 2019 onward, the new plant passport must be used for products that did not have a passport yet.
Usage of this new plant passport is mandatory from 14 December 2019. It is advised that you check with the inspecting authority of your country whether special rules apply to using the plant passport till 13 December 2019, and if the new plant passport must be approved first.
The parts described below are used when assigning passports
 Requirements
For authorisation and approval of the use of the new plant passport by your company, contact your country’s inspecting authority.
System settings
In File – Basic information – Stock items – PZ register, it is possible to adjust settings per organism.
WinTree® CONNECT has a built-in PZ register containing the codes as they are known to TSD. Based on this, the PZ register has been filled out as much as possible.
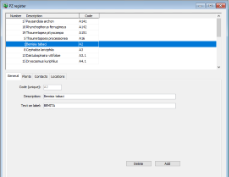


On the ‘General’ tab, the unique code (4 characters max.), the description and text which will be printed on the label (i.e. EPPO code) are displayed here. These details can be changed here, excluding the unique code.
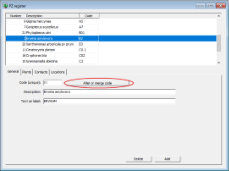
On the ‘plants’ tab, whether this code is used for a plant is determined here. This can be done on various levels; per genus, per match code, all plant names starting with, and based on size sequence code.
If an organism applies to an entire genus, then every plant name of that genus should have the genus name linked to it. This can be done in the ‘maintain plant names’ screen.
When applying the code to an entire genus, do not forget the Genus with the (F), (L) and (O) suffixes.
If an organism applies to all Genus, a * can be selected.
If the code applies to a species, do not enter a genus, but alter the match code and ‘plant name starts with’. Keep abbreviations in mind when doing this.
On the ‘Relations’ tab, the relations will be connected based on their areas. Relations can be added by clicking [add], or [add ++] for multiple relations.
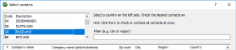
This option will show a screen in which all relations (customers and suppliers) per country are displayed. The selection will initially be per country. Use the [X] to select all displayed relations. Use ‘filter’ to filter the list more (e.g. city, region, etc.). After marking a relation, it will immediately be added. Use [delete] to remove the selected relations from the organism.
On the ‘Locations’ tab, all locations that have been checked for that organism (by the inspecting authority) can be added to the organism. Click on [add] and the location number can be entered in the line and confirmed with [tab]. It is also possible to connect all organisms a location has been checked for. This can be done in the ‘maintain locations’ screen.
 Phytosanitary registration number
Only when any changes have been made in the PZ register can [define passport settings again] be used to apply the changes to all existing batches and sales order lines.
 |
Any manually changed PZ codes in sales orders will be set to the (new) standard value. This function can only be used by a WinTree® administrator, and no other WinTree® users should be logged in when it is used. Depending on the size of the database in use, this may take 15 to 60 minutes. |
PZ conflicts may arise when this function is used. These conflicts are explained in their own chapter in this manual.
Labels
Part of the new plant health regulation is the mandatory use of the following fields on labels:
- An image of the European flag.
- The word ‘Plant Passport, supplemented with ‘- PZ’ if the plant has a PZ code
- The description of the organism (only if the plant has a PZ code)
- A: Plant name or genus name
- B: The user’s phytosanitary registration number
- C: Batch identification number
- D: The original ISO-code of the country of origin
It is important that:
- All these fields are present on the label
- The fields are close to each other, so that they can be recognised as passport fields. This means no other fields (i.e. customer number, size code, etc.) should be between any of the passport fields.
Because the traceability is based on the batch identification number, it is not possible to add these fields to every label. Lock tie labels, which are printed based on the lay-out of the delivery line used to print them from, are the only type of label these fields can be printed on.
Every lock tie label can be provided with these 7 mandatory passport fields. These fields can be added to an existing lock tie label.
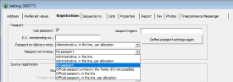
Select the label that has to be edited and go to the ‘lists’ tab in File – Settings. Click on [layout wizard]. The lay-out wizard will be opened, displaying the selected label’s fields.
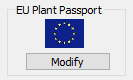
For each lock tie label, go to the ‘extra’ tab and [Activate] the EU plant passport.
This can only be done for lock tie labels or copies based on lock tie labels.
Depending on the kind of lock tie label, a few options for printing the passport information on the label will be displayed:
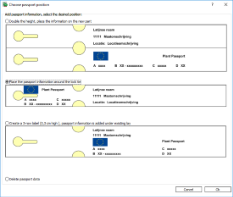
Choose a lay-out and press [Ok].
It is possible to change the chosen lay-out. After clicking on activate and selecting a lay-out, the [activate] button will have been changed to [change]. By clicking on it again, the options screen will be displayed, and a new choice can be made.
If the lay-out is not as desired, it can be changed manually. How to move fields is explained in ‘alter label lay-out'.
The passport data must be added to the layout as a single area. According to the regulations, no other data may be present in this area.
If sticky or pot labels with the passport data are used, then TSD will have to add these fields manually. Contact TSD if this is the case.
After editing the lay-out, it must be approved for use by your country’s inspecting authority.
Working
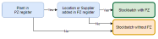
When booking a new stock batch, a PZ code will be linked to the batch based on three conditions;
- The plant name of the batch must be registered in the PZ register, or the genus linked to the plant name has to be registered in the PZ register
- The location must be linked to one or more PZ codes.
- The batch will only be assigned a PZ code if the two conditions above contain the same PZ code(s).
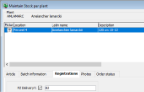
A maximum of 5 PZ codes can be linked to a batch. The linked PZ code(s) can be viewed per plant or location on the ‘Registrations’ tab of the Maintain stock menu. Multiple PZ codes will be separated with commas. These assigned PZ codes can be altered manually. In the ‘PZ?’ column, a check box and text field is available. If this check box is ticked, that means one or more PZ codes have been linked to the batch.
Batches booked without any PZ codes that are moved to a location with any PZ codes assigned to it will not automatically have those PZ codes assigned to it*. These PZ codes can be assigned to the batch manually. Check the ‘PZ delivery’ check box. Based on the genus and location, the correct PZ code(s) will now be assigned to the batch.
If a batch containing any PZ codes is moved to a location without any PZ codes, the PZ codes will not be removed from the batch. This can be done manually by toggling the ‘PZ delivery’ check box off.
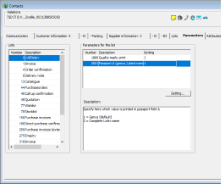
*) If batches are merged and parameter 104 ‘totalise’ is enabled, then the batch the other batch is merged into will keep any PZ codes assigned to it.
Fictitious stock/purchased batches will receive any PZ codes if:
- The plant name of the batch must be registered in the PZ register, or the genus linked to the plant name has to be registered in the PZ register
- The supplier is registered in the PZ register.
To summarise: when booking a stock batch or purchase lines, PZ codes will be added to the batch based on the PZ codes linked to the booked plant name and whether the location or supplier is registered in the PZ register.
When booking purchase order lines, the PZ code assigned to the customer is taken into account. Per line, depending on the genus of the booked plant name, the line will be assigned the right PZ codes. A maximum of 5 PZ codes can be assigned to a purchase order line. These PZ codes are used for sorting.
Direct booking of sales order lines
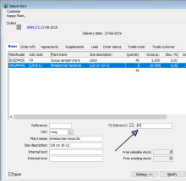
If a sales order line is directly entered in the ‘Sales orders’ screen, the assigned PZ code(s) are displayed in the details. The assigned PZ code can be removed from the line. The line will then receive a normal plant passport, like any other line without any PZ codes.
Booking sales order lines using the Order Entry menu
If a sales order line is booked in the Order Entry screen, batches that contain PZ codes that do not correspond to the PZ codes of the customer / plant genus will not be shown. If the Order Entry menu is set to ‘Allocate to ticked batch’ then these batches cannot be clicked and allocated to.
The article is visible if the Order Entry screen is set to catalogue or if the match and size code are entered manually. This means the article can be added to a sales order, and a PZ code can be linked to the sales order line.
It is possible to ignore the PZ settings in the Order Entry screen by enabling [Ignore PZ]. This means all batches will be visible and can be allocated to, despite not having corresponding PZ codes. This will result in a normal plant passport being printed, instead of a PZ passport.

Allocation
Because of trackability, allocation is mandatory. If sales orders are automatically allocated (which can be set in the properties of the sales order menu), only sales order lines that contain a PZ code that correspond to the PZ codes of the stock batch will be allocated. A sales order line containing a PZ code will never be automatically allocated to a batch without this PZ code.
summary:

If a sales order line contains multiple PZ codes, it will be automatically assigned to a batch with the right PZ code. If multiple right batches are available, the same allocation priorities as used by deliveries without PZ codes will be used.
Maintaining
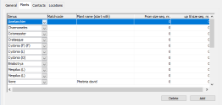
This table can be opened by going to File – Basic information – Stock – Genus groups.
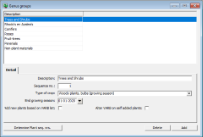
- Cuttings
- perennial herbs (4 wks.)
- Woody plants, bulbs (end of the growth season), the end date of the season can be entered
- Bonsai-plants, Citrus plants (2 mths.)
- Dead materials (No passport), this group is linked to the new genus ‘Dead materials’, which can be assigned manually to plant names that are not actual plants (e.g. soil, stakes, delivery costs).
All known genus (VARB-standard) are allocated one of these genus groups during the conversion.
Check with your country’s inspecting authority if these periods are correct.
Based on the genus groups, all plant names can be provided a new plant sequence number. To do so, click on [determine plant seq. nrs.]. A screen will open asking for confirmation. This action can only be done if no WinTree® users are logged in.
|
IMPORTANT: This action is irreversible. |
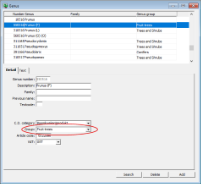
In the ‘Genus’ screen, a genus group can be linked to each genus using the ‘group’ field. This screen can be opened by going to File – Basic information – Stock – Genus. The default Genus have already been entered by TSD during the installation, based on the groups present in the standard plant names list used by the VARB.
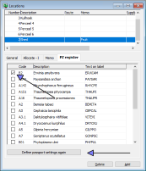
Per location, the organisms the location has been checked for should be indicated here by ticking the PZ codes in the location screen. To open this screen, go to File – Basic information – Stock – Locations. On the PZ register tab, all PZ codes are displayed, and can be ticked here. PZ codes that have been linked to locations in the PZ register are already ticked and can be removed from the location here as well. If a location has not been assigned any PZ codes, then batches booked on that location will not be assigned any PZ codes either.
Use the [define passport settings again] option to assign the PZ codes of the locations to already booked stock.
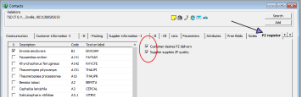
On the PZ register tab of the maintain contacts screen, the organisms a contact should have a PZ passport for are displayed. Any PZ codes assigned to a contact in the PZ register are already ticked and can be removed as well. For new contacts, the right PZ codes should be ticked. The ticked PZ codes can be used for both buying and selling.
PZ conflicts
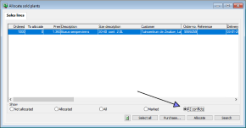
If any conflicts arise because the settings of the allocated line to do not correspond to the settings of the plant of customer, then the sales order/delivery line is marked. This can happen when the [define passport settings again] option is used. This marker can be inspected. To do so, go to Sales – Allocate – Allocate sold plants or Allocate plants in delivery or delivered.
All marked lines can be found by selecting ‘PZ conflicts’ in the selection bar at the bottom of the screen. The search screen that opens can be closed to view the complete list of PZ conflicts.