


The menu File -> Print shows an overview of all available documents. Select the document which need to be printed. This menu is very useful to print out overviews or to reprint a document. Open the menu File -> Print to select a document.
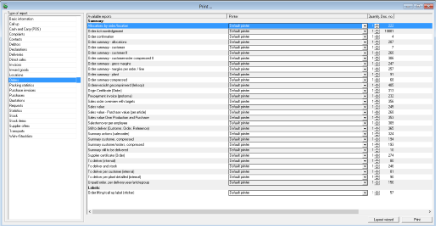


The opened screen shows two columns. The left column shows the print groups. Select a print group and in the right column all available documents in that group will be shown.
 |
Only documents which are ticked as "Show" are available and can be used for printing. |
The default printer and the amount of prints (does not apply to labels) can be changed. Select the desired document and click on [Print]. A print selection window will be opened. The appearance of the window is dependent on the type of list that has been selected. In the majority of cases, the window consists of two parts: a selection part and a settings part.
Part 'Selection'
Picture below shows the print selection window of the invoice (document 319).

In this part of the window you can specify the selection of what you wish to print. By specifying a selection, you restrict the actual result that will be printed on paper. If you do not specify a selection, all the data that is available for the selected list will be printed. If, for example, you want to print just invoice number 1, you type in the selection field 'Invoice no.' the number 1. The second selection field (column Up to) now turns white. It is not necessary to type in 1 as a number again. You only type a number in the second selection field if you wish to select a series, for example, you want the invoices for invoice 1 through 15.
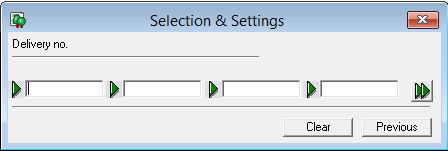
As well being able to select an unbroken series of numbers, it is also possible to select several random numbers. To do this, click on  .
.
In the window that now appears, you can type in four random numbers. If you wish to select even more numbers, click again and you will be able to select another four numbers. You can repeat this action several times. Make sure, however, that [Previous] and [Clear] remain visible on the window. Of course it is not necessary to type in multiples of four. Using [Clear], you delete all the numbers you have entered in the current session. When you have typed in all the numbers, click on [Previous]. You will now be back in the first window with the Print selections. You cannot see which numbers you have selected in this window. The selection fields are coloured grey.
The selections are often based on number (customer number, invoice number or date). WinTree Nursery Manager can help you to select the correct number. Click on  . A search window appears in which you can search on criteria such as match code, quality code, and other selection criteria. Select the correct data and click [OK]. The number will now be entered in the selection field.
Part 'Settings'
In addition to making a selection, you can also specify which data will be printed for each list. Depending on the list type, you can print off a number of fields. You can specify this in the Settings part of the print selection window (these will sometimes be divided across several tabs) Every field that can be printed or not is mentioned with a description, preceded by a checkbox. If you select a checkbox (by clicking it with the mouse), then the field with the correct data will be printed. It is sometimes possible to define a print setting using a radio button.
|
Often you will see the line: “Re-print already printed lines”’ with a checkbox. If you select the checkbox, the lines that were already printed will be printed again. If a documt is already printed and you don't tick this checkbox, WinTree will show a pop-up screen with the message "No data found for this selection". Tick the checkbox and the document will be reprinted. |
 Button [Example]
Click on [Example] to show a print preview of the document on the screen. If a selection is made, the preview can contain multiple pages. Close the preview with the cross-button (rigth upper corner).
|
The example on the screen is not always representative of the final print result. If the preview shows a 'strange' result, print the document on paper before contacting TSD for support. |
Button [OK]
Click on [OK] to print out the document with the selected settings.
Button [Cancel]
Click on [Cancel] to cancel the print process. No prints will be made.
Button [Options >>]
Use this button to clear the entered settings.
Use the option 'Export (Crystal Reports)' to export the data of the document to e.g. Microsoft Excel. Read the manual 'Exportíng data' for more information about exporting data.