


Treeview is a method to show big amounts of information by group. With this there can be easily navigated to the desired information. A known example of a treeview is the Explorer in Microsoft Windows. When opening the window not all information is shown directly. There is navigated through the map structure to eventually get to the desired information.
WinTree also has an amount of windows that shows a lot of information the moment the window is opened. These windows can be set up so that the information is grouped by treeview. This makes it easier to search for the correct information.
WinTree has the possibility to set up the treeview to own insight, where there can be determined on what there has to be grouped and if the underlying information also has to be grouped. The use of treeview can easily be set up but also easily be turned off when not liking the use.
 Module composition
Treeview can be used with every module composition. Of course the amount of windows that can be set up is dependent on the used module composition. When using WinTree in a network then the use of the treeview is saved per window per employee. So employees can determine for themselves in which windows the treeview has to be used.
Applicable in windows
Treeview can be set up for every window in WinTree for which a customised display can be used. The most used are the windows in which a big amount of information is shown. A few examples of windows that become more clear by using treeview are:
- Deliver sales orders
- Confirm deliveries
- Allocate plants in order
- Allocate plants in delivery / delivered
- View stock items
Setting up Treeview levels
This manual explains how a treeview can be set up. With this the window Deliver Sales order (menu Sales orders -> Deliver sales orders) is used as an example. The setup of treeview for other windows is done the same.
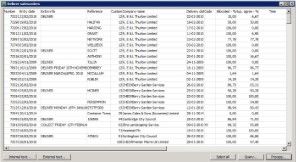
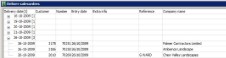
The window is opened and has the default lay-out as shown below.


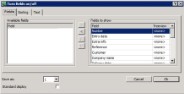
The use of treeview is set up via the display of the window. Right-click somewhere in the window and choose the option 'Adjust current display'. The picture below shows an example of a window that is opened.
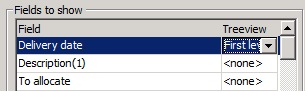
In the column on the right are all available fields shown where treeview can be set up for. Select the field which will serve as the main item of the treeview, for example Delivery date. Click on the column 'Treeview', and a dropdown list will be shown from which 5 levels can be chosen and a Total amount. Choose for the main item the first level.
On the left in the window, a number (1 to 3) can be selected to which the treeview can be saved. Put a tick in the checkbox 'Default display' if this display now has to be shown by default. This settings can be set per WinTree-user. Close the window via [OK]. The Deliver Sales order-window now shows the information grouped on delivery date.
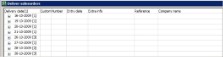
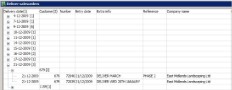
By clicking on the plus-sign for the delivery date the lines below are shown, Behind the delivery date is between brackets () the amount of underlying lines. In the title of the column is between brackets () the level on which the treeview is based. The picture below is an example of the window if there is clicked on the plus-sign for the delivery date.
A main item can be subdivided into four underlying levels. Of course the window for which the treeview has to be set up has to have information that can be grouped this far. In case a main item (first level) has to be subdivided further, this then also has to be set in the display of the window. Right-click somewhere in the window and choose the option 'Adjust current display'. In the opened window the first level is already set up in the column on the right. Select the field on which the second level has to be grouped, for example customer. Close after setting up the window with help of [OK]. The picture below shows an example of a window set up with two levels.
Setting up Treeview Total amount
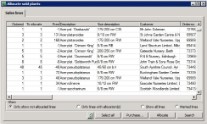
When setting up treeview, it is possible to make summations. With this the amount from a selected column are summed up on the basis of the set level. A good example of a window where the treeview can be used like this is in the 'Allocate sold plants' (menu Sales -> Allocate). Normally this window, after entering a selection, is opened as the picture below.
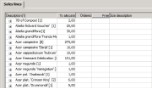
This window can be set, that per plant name one line with the total to be allocated amount is shown. Go for this via the right-click to the option 'Display'. Choose the option 'Adjust current display'. Select first a column to determine the first level. Choose after this a column in with the to be summed up amount. Select in the dropdown list in the column 'Treeview' the option 'Total amount'.

Save the display and close the window with [OK]. In the window, the following picture will be shown.
Undo the setting
If the use of treeview is set for a window, then this treeview can easily be turned off without the loss of information. This can be done by putting in the column 'Treeview' the choice to <none> in the window where the treeview is set up. Then save the display by clicking on [OK]. It is also possible to delete the entire customised display. Right-click for this and choose the option Display -> Delete current display. With this all changes in the display so also movements of columns or sortings, are deleted. The window will be displayed again according to the TSD-default.