


When installing the database, the Cash&Carry window is filled by default via the TSD software. We will now describe how you can modify this window and adapt it to suit your wishes.
If you are logged on as Administrator, you can adapt the window straight away. To modify the window for a user, please read the manual for this module.
The window contains pre-programmed buttons that can be individually adapted. The description of how to adapt the button below therefore applies to all the other buttons. The only difference is the functionality of the button. You will find a description of the functionality that can be defined under a button at the end of this chapter.

If you click on a button with the right mouse button, via the Properties option you can adapt this button to how you want it to be.
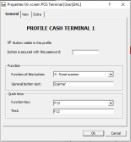


 Tab page "General"
The general settings that can be defined for this button can be found on the tab page "General".
Button visible in this profile.
If this option has been ticked, this button will be visible on the Cash&Carry window for the profile specified above. If this button is not visible, you will see this space as being available on the Cash&Carry window and it can be activated again via the right mouse button. All the buttons that are not visible are in black, and can be re-activated here. If you are logged on as Administrator, these black buttons are not visible and you have the possibility to modify the background colour of all the unused buttons.
Button is secured with this password.
If a password is entered here, the button can only be started after this password has been entered.
Function of this button
Specific functions can be defined under the button. A more detailed explanation of the various functions is given at the end of this chapter. Functions that can be defined can be divided into different categories: functions that relate to the working of the window (Scroll top, Scroll next, etc.); functions that apply for a scan line (add line, modify line, etc.); and functions that apply for the whole order (Search order, Print invoice, etc.).
General button text.
The text that is entered here will appear above the image on the button, centre-aligned.
Function key
If a button can also be activated via a function key, there is an option to assign the Windows function keys to this button. Only function keys that have not yet been assigned to buttons can be selected.
Text
The text entered here will be displayed to the lower left of the button. Make sure that the text corresponds to the function key that has been selected and is available when a function key is activated.
Tab page "View"
The tab page "View" contains settings that apply to the appearance of the button. Additionally, the option exists to allow this to apply to all buttons.
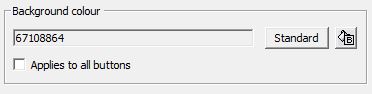
Background colour
Clicking on the standard button will define the default Windows colour for a specific button. Clicking the  button next to it will result in the Windows colour palette appearing. Clicking on a specific colour will activate it. A standard functionality in Windows is the option to compose a new colour yourself. You can also enter a colour code corresponding to the RGB scheme of colours. If you tick the option 'Applies to all buttons', this colour definition will apply to all activated buttons.
Picture GIF (48x48)
Via the explorer button  you can search on a disk for images that can be defined for this button. The image must meet the criterion of the 'Transparent GIF 48 x 48 pixels'. Choose the transparent colour black or red (the program cannot deal effectively with transparent white). By default, WinTree offers pre-designed images in the APOS WinTree directory.

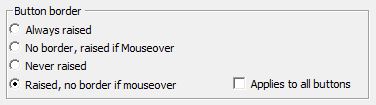
Border buttons
By defining an option, you can specify how the program has to respond if this button is clicked (raised or not). If you tick the option 'Applies to all buttons', this definition will apply to all defined buttons.
TIP: You can also define the whole background with a specific colour. If you click on an area for which no button has been defined, you can define a colour for it.
Tab page "Extra"
This tab page must be defined in collaboration with TSD because an incorrect setting will result in certain functions no longer working which then can only be re-activated by TSD.

The X and Y positions of the button can be defined in mm. In exceptional cases, these values can be modified.
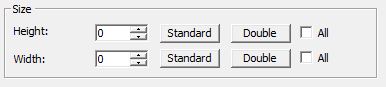
The format can be defined in this section. In normal situations, you should only use the Standard and Double buttons to use the pre-set measurements. By ticking the 'All' option, the format for the height and/or width of all buttons will be defined.
Help text
If a specific text is entered here, the text will appear if the mouse hovers over this button for a few seconds. The text will be displayed in a 'balloon'. The text will only be displayed if the bubble function in the menu under HELP has been ticked.
Functions that can be defined
Below is a list of functions that you can define for a button. An explanation is also given of the conditions under which these functions work.
If the scan lines are imported using day numbers, the correct customer info will be displayed in the top right of the window.
If the scan lines are imported via a keyboard scanner or without a day number, the Cash Sales customer can be modified to a 'regular' business customer from the contact file.
In the 'Customers' search window, select the desired customer.
If sales lines that have already been scanned are imported, and if the new selected customer has a new VAT rate or another currency, the prices will be converted automatically.
This button can also be used when an error has been made in importing scan sales lines with day numbers. In this case, the customer can still be modified.
If a keyboard scanner or a scanner without a day number is used, you can also modify the customer before importing the scanned sales lines.
This option can be used if the barcode number of the sold article is not known. The order entry window for sales orders will now open. On the left-hand part of the window, the cursor is positioned in the 'Plant name' input field. Enter here the desired match code of the plant that is about to be sold. Click on [Tab].
In the bottom right-hand corner of the window, all the stock item lines of the match code that have been entered will be displayed.
From this list, select the article that is about to be sold. On the left-hand part of the window, the plant size will now be filled and the cursor will be positioned in the 'Quantity' input field.
If there is only one stock item line of the match code that has been entered, this line will be selected automatically. The cursor will then go directly to the 'Quantity' input field.
After entering the quantity, click on [Tab] to modify the price.
Click on [OK] when all the data has been entered. The line will be added and allocation will take place on a stock batch of the article. If there are multiple stock batches of the article, allocation takes place according to the allocation priority. If the allocation priority is identical for all stock batches, allocation will take place randomly.
If multiple articles need to be added to the scan sales order, click on [New] in the order entry window after entering the first added item. The entered article will appear in the scan sales order and the cursor will be positioned in the 'Plant name' input field.
A new article can now be added to the scan sales order. In this way, multiple articles can be added to the scan sales order. When the final article has been added, click on [OK].
The scan sales window is displayed again with the added articles in the list area.
WARNING! If the amounts change, which would result in another price (price tabeling for business customers), the price will NOT be adjusted via this function. You will need to use the 'Advanced modifying (21)' function for this. This will start up the order entry window.
Scanned sales lines can be added to existing sales orders in the system. Select the sales order to which the scanned lines must be added before reading the scanned sales lines.
In the Sales orders search window, you can search for and select the sales order you want. The customer info will be retrieved from the sales order. After reading the scanned sales lines, the prices will be filled according to the settings from the sales order.
Via the Properties of the scan window, you can specify whether only scan orders or also regular NM orders can be displayed. The selected (parked) order will be displayed in the scan window and the current scan will be parked.
WARNING! Only for business customers. If the default scan customer is chosen, this button will be blocked (select customer first).
Report 8: Normal delivery note
If a scan file is being used, and the C&C program recognises that a scan file has been prepared, this button will start to blink.
Windows will remain available as normal. Only the scan application will be locked.
Packing can be added to the scan order with this button. The packing codes should be present in WinTree Nursery Manager. These lines are added to the scan order and also maintained in the packing administration.
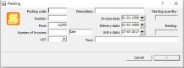
The extra text that can be added is visible in the packing administration.
Modifying or deleting a packing line is done in the same way as deleting a plant line.
WARNING! This only applies to business customers.
The discount window is displayed.
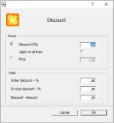
This gives you the option to assign a discount for the line that is active, or to apply the discount to all lines. You will need to activate the checkbox to enable this. You can also simply change the price to another price. The discount will then be specified as a fixed amount. This will then apply only for the called-up line.
This will change the current scan line via the order entry window. An explanation of the order entry window is a standard part of WinTree Nursery Manager.
This button is used when an unknown barcode is read while importing a scan batch. The scanned sales line will then be in red with the text '***Unknown barcode: number'.
A search window entitled 'Plant names' will be opened. Enter the desired match code of the plant that the customer wishes to buy here. After selecting the plant name, all articles (stock item lines) of the selected plant name will be displayed in the opened window (order entry window sales orders), in the right-hand list area. In this list, click on the article that has been sold. On the left side of the window, an amount can be specified and the price can be modified.
Instead of selecting the article in the list, you can also modify the plant size. To do this, click on the left side of the window on the size and enter the desired size. After pressing on [Tab], the cursor will move directly to the 'Quantity' input field. Modify the amount and press the [Tab] key again. The cursor is now located in the 'Price' input field. The price from the stock items, if available, is filled in. Of course you can modify this price if you need to.
Now click on [OK]. The window will close and you can continue to process the scan sales order. The sales line is now automatically allocated on an existing stock batch of the article. If the program can choose from more than one stock batch, the allocation window will be displayed in which the sales line can be allocated.
Depending on the number of stock item lines, filling the list area in the order entry window may take some time. Only use this method of modification if you have to allocate directly on the right stock batch via the scan sales window.
If the article is correct but the amount is wrong, click on the amount and change it. After entering the amount, click on [Tab] to update the allocation.
This way, the price can be changed.
By selecting a customer, you can view the status of their credit balance. If a customer's credit limit has been exceeded, a warning message will be displayed in the top right-hand corner of the window. When exactly this message is displayed depends on the value that has been defined in parameter 323. Additionally, parameter 354 must be set to 2 to be able to establish the credit limit when scanning.
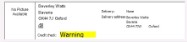
The following values may be seen in the Credit check field:
| OK | Means that the customer is within their credit limit and there are no payment problems. |
| Warning | The limit has been exceeded but it is still possible to buy on credit. |
| Warning + Some lines that have been scanned are coloured red. | The customer has exceeded the limit and the lines in red must be paid in cash, other lines can be paid on credit. |
Only for business customers. You can also enter a non-standard payment and/or delivery condition in this window.
This function starts up the settle window. It is only available if one or more lines are active.
When settling, a method of payment must be selected so that payment can be made. The method of payment is defined in the basic information for method of payment of WinTree Nursery Manager.
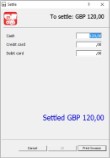
If the amount paid is higher than the amount to be paid, the amount of change that must be given will be displayed. A cash receipt can only be printed if the amount entered is greater than or equal to the amount to be paid by a cash customer. A business customer can pay on account.
The only difference is the title.
Report 287 Copy of order confirmation (4)
Report 295 Copy of delivery note (8)
 32. Transfer quotation (module dependent)
33. Save/print as quotation (module dependent)
35. Re-print last delivery note
38. Re-print last proforma invoice
39. Re-print last proforma delivery note
43. Purchase (module dependent)
45. Allocate plants in delivery/delivered
46. Call-ups (module dependent)
47. Supplements (module dependent)
This button enables you to see which supplements have been charged on this scan order. Using this window, you can determine whether or not to charge specific supplements.
The supplements are made visible in the scan order in various ways. If an extra supplement is charged for an article in an order, this can be seen below the article for which the supplement applies. The supplement is displayed in light grey.
If an extra supplement is charged that is inclusive for the article, the supplement will be included in the selling price. This will be made visible when you modify the line.
The price including the supplement is displayed between brackets below the normal price. If you modify the lines via the order entry window, the inclusive price will be displayed between brackets.
Additionally, the order line will be displayed on the right-hand side and the supplements that have been applied to the line will be displayed here. For a more detailed explanation of how supplements work, please see the manual about Supplements.
If a supplement is charged across the whole order, and this is printed at the bottom of the invoice, this will also be visible at the bottom of the screen next to the total.