


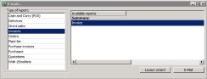
In the menu File -> E-Mail an overview is shown of all documents that can be sent per e-mail. Open the menu File -> E-Mail to select a document. The opened window shows two columns. In the column on the left are the type of reports. Click on a type of report and in the column on the right all available documents of the type are shown.


 |
Only the documents that are ticked in the column 'E-Mail' in the program settings, are shown here and can be sent per e-mail. The amount of shown documents then for the menu File -> Print. |
Select the desired document and click on [E-Mail]. Depending on the chosen document, a print window is opened and contains a frame 'Selection' and a frame 'Settings'.
Frame 'Selection'
The picture below is the print selection window of the invoice.
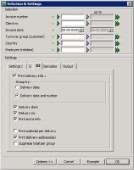
Depending on the document, in this frame, selections can be made based on for example invoice number or a date. A selection can be made for one number or date by giving the field on the left a value. The field on the right can remain empty. In case a client number has to be set as the selection criterion then a search window can be opened by clicking on the green arrow on the left. In this search window there can be searched on match code. After selecting the correct client, the client number will then be shown in the print selection window.
A range 'from- up to' can be selected by entering the starting number (or date) of the range in the left field and the last number (or date) in the right field. This way of selecting gives a non-interrupted range.
It is also possible to make an interrupted selection range. Click for this behind the selection criteria on the double green arrow. A separate input window will be shown in which four separate numbers or dates can be entered. If necessary, it is possible to click on the double green arrow again to enter the next four numbers. Close the window after entering the numbers or dates via [Return]. In the print selection window the input fields of the selection criterion will both be grey.
By entering a selection criterion, only the documents with this selection criterion are sent per e-mail. For example: when sending an invoice per e-mail with selection criterion on invoice number 4 then only the invoice with invoice number 4 is sent. Between the description of the selection criterion and the input fields, there is a green V by default. Click on this V and a red X will be shown. In case then a selection criterion is selected, this criterion will NOT be included when sending. For example: when sending an invoice per e-mail with selection criterion on invoice number 4 where now a red X is shown, all invoices will be sent except for the invoice with invoice number 4.
Combinations of selection criteria are possible. The more selection criteria have been entered, the lesser there will be sent. Entering no selection criteria means that all invoices will be sent.
Frame 'Settings'
In this frame checkboxes can be ticked or unticked. The default values of these checkboxes are saved in the program settings. The settings can, depending on the selected document, be divided over multiple tab pages. All settings can be altered before printing.
|
Use the print setting 'Reprint already printed lines' in case a document has to be sent per e-mail again. In case the invoice is already sent and you did not tick this setting, a pop up will show with the message: "No data found for this selection". Tick the setting and the document will be sent. |
 Button [Example]
Via [Example] a print example of the document is placed on screen. In case a range has been set up for one of the selection criteria then the example will be divided over multiple pages. Close, before printing the document, the example window via [x].
|
There are circumstances where the example on screen does not correspond with the real print. In case the example shows strange data, the document needs to be printed on paper. If the data on paper still does not correspond with the expectations, support can be asked from TSD. |
Button [OK]
Click on [OK] to send the document with the entered selection criteria and settings
Button [Cancel]
Button [Options]
With help of this button the entered selection can quickly be cleared. Click on the button and choose the option 'Clear selection'. The entered selection will directly be deleted. The option 'Export (Crystal reports)' is used to export data to for example Microsoft Excel. Read for this the separate manual Export.
Pop-up window
After entering the selection the e-mail will be sent via [OK]. Before sending the e-mail there can automatically be a pop up window opened first. This pop up window will be opened if:
- Parameter 1035 has the value 1.
- No e-mail address is available.
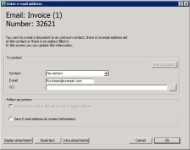
The information of the contact for which the document is meant, is shown in the opened window.
Frame 'To contact'
| Contactperson | The default contactperson from the contact information is shown here, unless the contact person is changed in for example the sales order. With help of the dropdown list one of the other contact persons from the contact information can be selected. |
| E-mail address |
The e-mail address of the contact person is shown here. In case this e-mail address is not available, the general e-mail address from the contact information is shown. The shown e-mail address can be altered here. |
| CC |
Insert manually the email addresses to which the e-mail has to be sent as well. With help of
In case parameter 1742 has value 1 then the own employees (from the basic information) are shown here as well. The selected e-mail addresses will, separated by the semi-colon(;), be shown in the input field. |
 it is possible to select e-mail addresses of contact persons from the contact information.
Frame 'Follow-up actions'
After the correct information is entered in the frame 'To contact', the information can be copied to the general information of the contacts by putting ticks.
| Contact has another default output, change to Email? |
In case in the contact information the output preference is not on e-mail, can with the help of this checkbox the output preference be changed. This checkbox is only available if the output preference is NOT on e-mail. |
| Save E-mail address at contact information? | In case another E-mail address has been entered, then this new e-mail address can be saved at the contact information. |
Button [Display attachment]
Button [Email text]
Click on [Email text] to show the subject and the message.
The subject and the message come from the basic information. This information can be altered here.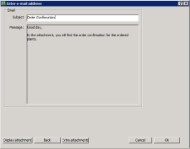
Button [Extra attachments]
Next to the PDF-file and (depending on parameter 1360) an Excel file, it is also possible to send separate attachments with the e-mail. With this photos and other files can be attached.
Click in the opened window on the Explorer-button (bottom-right). With help of the opened 'Windows Explorer'-window a file can be selected as attachment to the e-mail. There can only be one file attached at a time. When multiple files have to be attached, for every file the 'Windows Explorer'-window has to be opened separately.
With help of [Delete] an attached file can also be deleted again. The file will not be deleted from the hard disc of the computer.
|
Reduce the size of pictures before these are added as attachment to an e-mail. Too large attachments can slow down sending e-mails or even block it. |