


A large amount of data is stored in WinTree, data which should not always be viewed and accessed by everyone. It can be necessary to protect data when using WinTree in a network or on a stand-alone computer. Access rights for WinTree and further authorisation of some menus is managed through the WinTree Authorisation module.
Because WinTree data can also be accessed from outside of the office, for instance with the Contact app, it is important to keep data well secured. For this reason, the Authorisation module has become part of the basic software package. Every WinTree user can secure their access to WinTree with a password. Password protected access can be set for one unique user, or for several users, each with their own password.
Authorisation offers not only a password for each user but also the possibility to allow or deny users access to menus or functions. A user who is responsible for stock maintenance, for instance, can easily be denied access to sales orders. Menus can be set to ‘Access Denied’ mode as well as ‘View’ mode, where the user can view but not edit the menu. Using authorisation, entire programs, for instance WinTree Financial Administration, can be made inaccessible to some users.
When selections (available with the Fax module and the Office Manager program) are being used, it is even possible that some users are only allowed to edit sales orders or add customers from a specific selection.
Managing the rights for each user is done using roles. In a role, different rights are defined, after which the role is connected to a user. User rights may be tailored individually on a per-user basis, however, this makes managing rights less clear. The number of roles that can be created is unlimited
The following basic information data is used with Autorisation:
Don't forget to set up these basic information data

 |
This function is available from September 2015 |
Menu rights can be set for each menu. The simplest way to do this is by opening the menu and setting the rights for each role in there. In order to do this WinTree needs to be in ‘Setting mode’.
Now open a menu for which access needs to be set. Ensure to open the menu itself. Access cannot be set for search screens that are sometimes opened when opening a menu. If a search screen is opened, click close and re-open the menu to continue.
Then click on  .
.
Open WinTree as manager. Open the menu Extra -> Setting mode. In the WinTree title bar, the text **** SETTING MODE **** is added. In the toolbar, the icon is added.
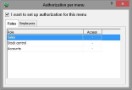


The pop-up screen that opens contains the checkbox 'I want to set up authorization for this screen'. Check this checkbox to set the menu access for each role. A number of menus are checked by default by TSD. This way, access can be set immediately for each role.
Tab page "Roles"
In the ‘Roles’ tab, click in the ‘Access’ column on the - sign. A drop-down list is opened in which the following options are available:
| Yes | The menu may be opened and the data can be edited. Some functions may still be limited via the role settings |
| View | The menu may be opened, but data can not be edited or added |
| No | The menu can not be opened |
| - | No rights set, equal to Yes |
Tab page "Employees"

After the menu is set, it can be closed by clicking the cross. The menu is now set up for autorisation. The settings for each role are also visible in the basic information Roles. Please read the description in File ->Basic information -> Other -> Roles.
If a menu is already set via Roles, this setting will also be viewed in this screen. These settings can be adjusted in the opened screen and will be updated in the role. This way every menu can be set in WinTree Nursery Manager, Office Manager and Financial Administration.
When an employee with a set up role starts to work in WInTree , he/she may receive notifications that they cannot continue to work in a specific area without authorisation.
Start-up of the program
At the start-up of any of the WinTree programs, the software checks to make sure the employee has access to the program. If the employees access to the program is set to 'No', the following notification is displayed:
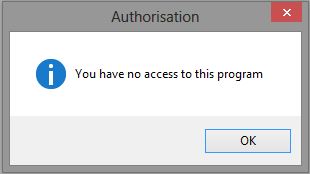
Close this notification by clicking [OK] and also close the login screen via [Cancel]. Ask the database administrator to set up the correct rights for the employee. TSD will never change these rights, it's the task of the database administrator.
Start-up of the menu
At the start-up of a menu, the software checks if the employee has access to the menu. If the access to the menu is set to ‘No’, a notification is displayed. Close this notification by clicking [OK].
When the menu is set for the employee to view only, the menu will be opened.
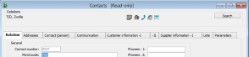
In the title of the menu the text [Read only] is displayed. Fields can be clicked but nothing can be changed. Buttons for adding data are invisible.
Authorised functions
When a role is set for a certain function to be inaccessible, the button for that function will not be visible to the employee. If for instance the [Confirm] button for delivery notes is set to No, the employee will not see the button on the Delivery Info tab in hte menu Delivery. The [Process] button in the ‘Sales’ menu –> Confirm Deliveries will also not be visible.
If sales representatives are working within the company, it is not always desirable that they can use or view each other’s customer information. In order to manage access to client information, the Data role and Data selection functionality can be used in a role. A selection can also be connected to a role. An employee connected to that role can then only use customers from the selection for the opening of sales orders. Also for the printing of overview documents, this selection is automatically used.
First create a selection (File -> Basic information -> Others -> Selections) in which the customers of the sales representative are included. Next create a new role, using a description that makes it clear for which sales representative the role is intended. Next apply settings for windows and functions for this role. Make sure that the access to the Basic information Selections for the role is set to No. Otherwise the sales representative will have access to adjust the selections himself. Check the checkbox ‘Data rol’ in the role. Choose the correct selection from the 'Data selection' drop-down list. Finally connect the sales representative via the employees to the role.
When an employee signs on to WinTree he/she will be able to open the menus as set in the role settings. If in the Customers search screen (Sales Orders menu) a %-sign is entered as search criteria for the company name, only the customers from the selection will be displayed. Without a data selection, all customers will be displayed in the search screen when using %. This also applies to the creation of quotations and delivery notes.
When an employee prints a sales order overview or statistic report, without a selection on customer number or name, only the data from customers from the selection will be included.
NOTE:
|
When testing with this option after setting the roles, WinTree should be closed completely and then restarted with the log in of the set up employee. Only after a full restart of WinTree, (not using File -> Open database, fill in another login name) will the new settings for a role be properly adopted. |