


Employees are used for various functions in WinTree:
- Representatives: The employees can be linked as representatives to relations??. Based on the representative, it is possible to print all kinds of documents whereby a selection can be made from these representatives.
- Login name: If WinTree is used in a network, all employees can use their own login name. If the Authorisation module has also been installed (module number 94), specific privileges for each employee can be defined.
The 'Employees' window consists of four tab pages.
 Tab page 'General'
On this tab page, you can enter the following info about an employee:
| Short name *) |
Enter a short name for the employee here, for example the employee’s initials. Give each employee a unique short name. An employee can log into WinTree with this short name. |
| Name | Enter the employee’s surname here. |
| Address | Enter the employee’s address here. |
| Postcode | Enter the employee’s postcode here. |
| City |
Enter the name of the city in which the employee lives here. |
| Country | From the dropdown list , select the country in which the employee lives. |
| Employed from/till *) | Enter the employee’s starting and leaving date here. If the Windows system date is later than the employee’s leaving date, the employee will be displayed in red in various dropdown lists. This makes it clear that a specific employee must no longer be used. |
| Cash screen profile *) | Enter the correct cash screen code here. This field will only be used for WinTree Cash & Carry. |
| Day of birth | Enter the employee’s date of birth here. If you are also using WinTree Office Manager, then a diary item will automatically be booked for the birthday. |
| Title | Select one of the titles from the dropdown list. |
| Firts Name |
Enter the employee’s first name here. |
| Department | Select the correct department using the dropdown list. |
| Telephone | Enter the employee’s telephone number here. In the smaller field behind the telephone number it is possible to enter the short dial code for example. |
| Fax | Enter the employee’s fax number here. |
| Mobile |
Enter the employee’s mobile number here. |
| Soc.Sec.No. |
Enter the employee’s Social Security number here. |
| Function | Enter the employee’s function description here. |
| Identification | Place a tick here if the employee has provided means of identification. |
| E-mail *) |
Enter the employee’s email address here. |
 |
Never enter the private email address in the employee data if emailing is also done via WinTree. In that case, use the business email address of the employee. |
*) the data from these fields will also be used by WinTree. The other fields, including the data entered on the tab page ‘Comments’, will not be used any further by WinTree.
Tab page 'Comments'
Tab page 'Rights'
It is necessary that at least one employee is set as the WinTree Manager. A manager has full control of all functions within WinTree. This employee can add employees and set rights.
Select the employee who will be the WinTree manager. Open the 'Rights' tab. Check the checkbox 'Manager'. This employee is now the WinTree manager. In order to enable the manager to change contacts, check the 'Change contacts' checkbox as well.
if the employee need to set up using a role, select one or more roles by clicking the check box behind the displayed roles.
Tab page 'Password'
Every employee can have his/her own password. This password can be granted when the manager adds a new employee. The password can also be updated by the employee themself after login. The password is case sensitive. There are no special requirements for the password concerning size or use of certain letters, numbers or characters. Any password can be entered.
|
TSD cannot adjust passwords for employees. |
When using roles it is the best to give every employee his/her own, unique, password. If no passwords are used, there is no benefit to setting up roles. Select the employee and open the tab page 'Password'. If the employee does not yet have a password this will be indicated by a red text on the tab.
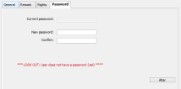


Leave the 'Current password' field empty. Enter the new password in the 'New password' field. Enter the new password (case sensitive) again in the 'Confirm' field. Then click on [Alter]. When the passwords in 'New password' and 'Confirm' are not equal a notification will be displayed. If this occurs, re-enter the password twice. When the passwords match, the password is updated. This is also confirmed by a notification on the screen. The employee can now sign on to WinTree with this new password.
If an employee has a password that needs changing, first the 'Current password' field needs to be filled in with the current password. Then enter the new password twice.
See also
The following manuals contain more information about the topics described:
• Departments
• Countries
• Autorisation
• Titles